Build an extendable in-browser devtools
Learn the fundamental concepts to empower your team.
Devtools are useful and part of our daily work as developers. If you're developing for the web, you've probably used the browser's devtools to debug issues, test changes, investigate network requests and many other existing features.
While the browser devtools are great, every application has different needs and therefore, could use specific tools. In some scenarios, creating a browser extension is the solution but it requires writing specific code for each browser and, in many cases, you can build a devtools in the web application itself.
In this blog post, you'll learn how to start your own devtools and build the foundation to expand and adapt this knowledge to your current team and projects.
Prepare the project
PS: If you want to skip coding along, feel free to clone the final repository and jump straight to the "Create the devtools" section for explanations.
For demo purposes, we'll use Next.js. Start a new project with npx create-next-app@latest --use-npm. Feel free to remove the --use-npm flag if you prefer to use yarn and adapt all mentioned commands accordingly.
Once the project is created, open the folder on your preferred code editor.
We'll be using components from @chakra-ui/react to have a decent layout without much effort and to avoid adding CSS to this post. Following the Getting Started with Next.js guide, install all necessary dependencies:
npm i @chakra-ui/react @emotion/react@^11 @emotion/styled@^11 framer-motion@^6
Once all dependencies are successfully installed, open the pages/_app.js file and replace its content:
import { ChakraProvider } from '@chakra-ui/react';

function MyApp({ Component, pageProps }) {
  return (
    <ChakraProvider>
      <Component {...pageProps} />
    </ChakraProvider>
  );
}

export default MyApp;
Create a couple of pages
Update the pages/index.js file with the following content:
import Head from 'next/head';
import NextLink from 'next/link';
import styles from '../styles/Home.module.css';

const HomePage = () => {
  return (
    <div className={styles.container}>
      <Head>
        <title>Index Page</title>
        <meta name="description" content="Index Page" />
        <link rel="icon" href="/favicon.ico" />
      </Head>

      <main className={styles.main}>
        <h1 className={styles.title}>Index Page</h1>

        <NextLink href="/layout" passHref>
          Go to layout page
        </NextLink>
      </main>
    </div>
  );
};

export default HomePage;
Create a new pages/layout.js file and paste the following content:
import Head from 'next/head';
import NextLink from 'next/link';
import styles from '../styles/Home.module.css';

const LayoutPage = () => {
  return (
    <div className={styles.container}>
      <Head>
        <title>Layout Page</title>
        <meta name="description" content="Layout Page" />
        <link rel="icon" href="/favicon.ico" />
      </Head>

      <main className={styles.main}>
        <h1 className={styles.title}>Layout Page</h1>
        <NextLink href="/">Go to index page</NextLink>
      </main>
    </div>
  );
};

export default LayoutPage;
If you run npm run dev and visit localhost:3000, there should be a link on each page that takes you to the other. Now, let's move on to creating the extendable devtools!
Create the devtools
Create a new file at components/Devtools/Devtools.js with the following content:
import {
  Box,
  Button,
  Tab,
  TabList,
  TabPanel,
  TabPanels,
  Tabs,
} from '@chakra-ui/react';
import { useState } from 'react';

const Devtools = () => {
  const [isOpen, setIsOpen] = useState(false);

  if (!isOpen) {
    return (
      <Box bottom="0" left="0" padding="1rem" position="fixed" zIndex="100000">
        <Button onClick={() => setIsOpen(true)}>Show</Button>
      </Box>
    );
  }

  return (
    <Box
      backgroundColor="white"
      bottom="0"
      left="0"
      padding="1rem"
      position="fixed"
      right="0"
      zIndex="100000"
    >
      <Tabs isLazy variant="enclosed">
        <TabList>
          <Tab>One</Tab>
          <Tab>Two</Tab>
          <Tab>Three</Tab>
        </TabList>

        <TabPanels maxHeight="300px" overflowX="auto">
          <TabPanel>
            <p>one!</p>
          </TabPanel>
          <TabPanel>
            <p>two!</p>
          </TabPanel>
          <TabPanel>
            <p>three!</p>
          </TabPanel>
        </TabPanels>
      </Tabs>

      <Button onClick={() => setIsOpen(false)}>Hide</Button>
    </Box>
  );
};

export default Devtools;
The component has a piece of state to hold if the devtools are hidden or shown. When hidden, display a button to show it. When shown, display some hardcoded tabs from Chakra UI and a button to hide the devtools.
Now open _app.js and update it to display the devtools. We'll make use of next/dynamic to lazy-load the component and only load it in the client:
import { ChakraProvider } from '@chakra-ui/react';
import dynamic from 'next/dynamic';

const Devtools = dynamic(() => import('../components/Devtools/Devtools'), {
  ssr: false,
});

function MyApp({ Component, pageProps }) {
  return (
    <ChakraProvider>
      <Component {...pageProps} />
      <Devtools />
    </ChakraProvider>
  );
}

export default MyApp;
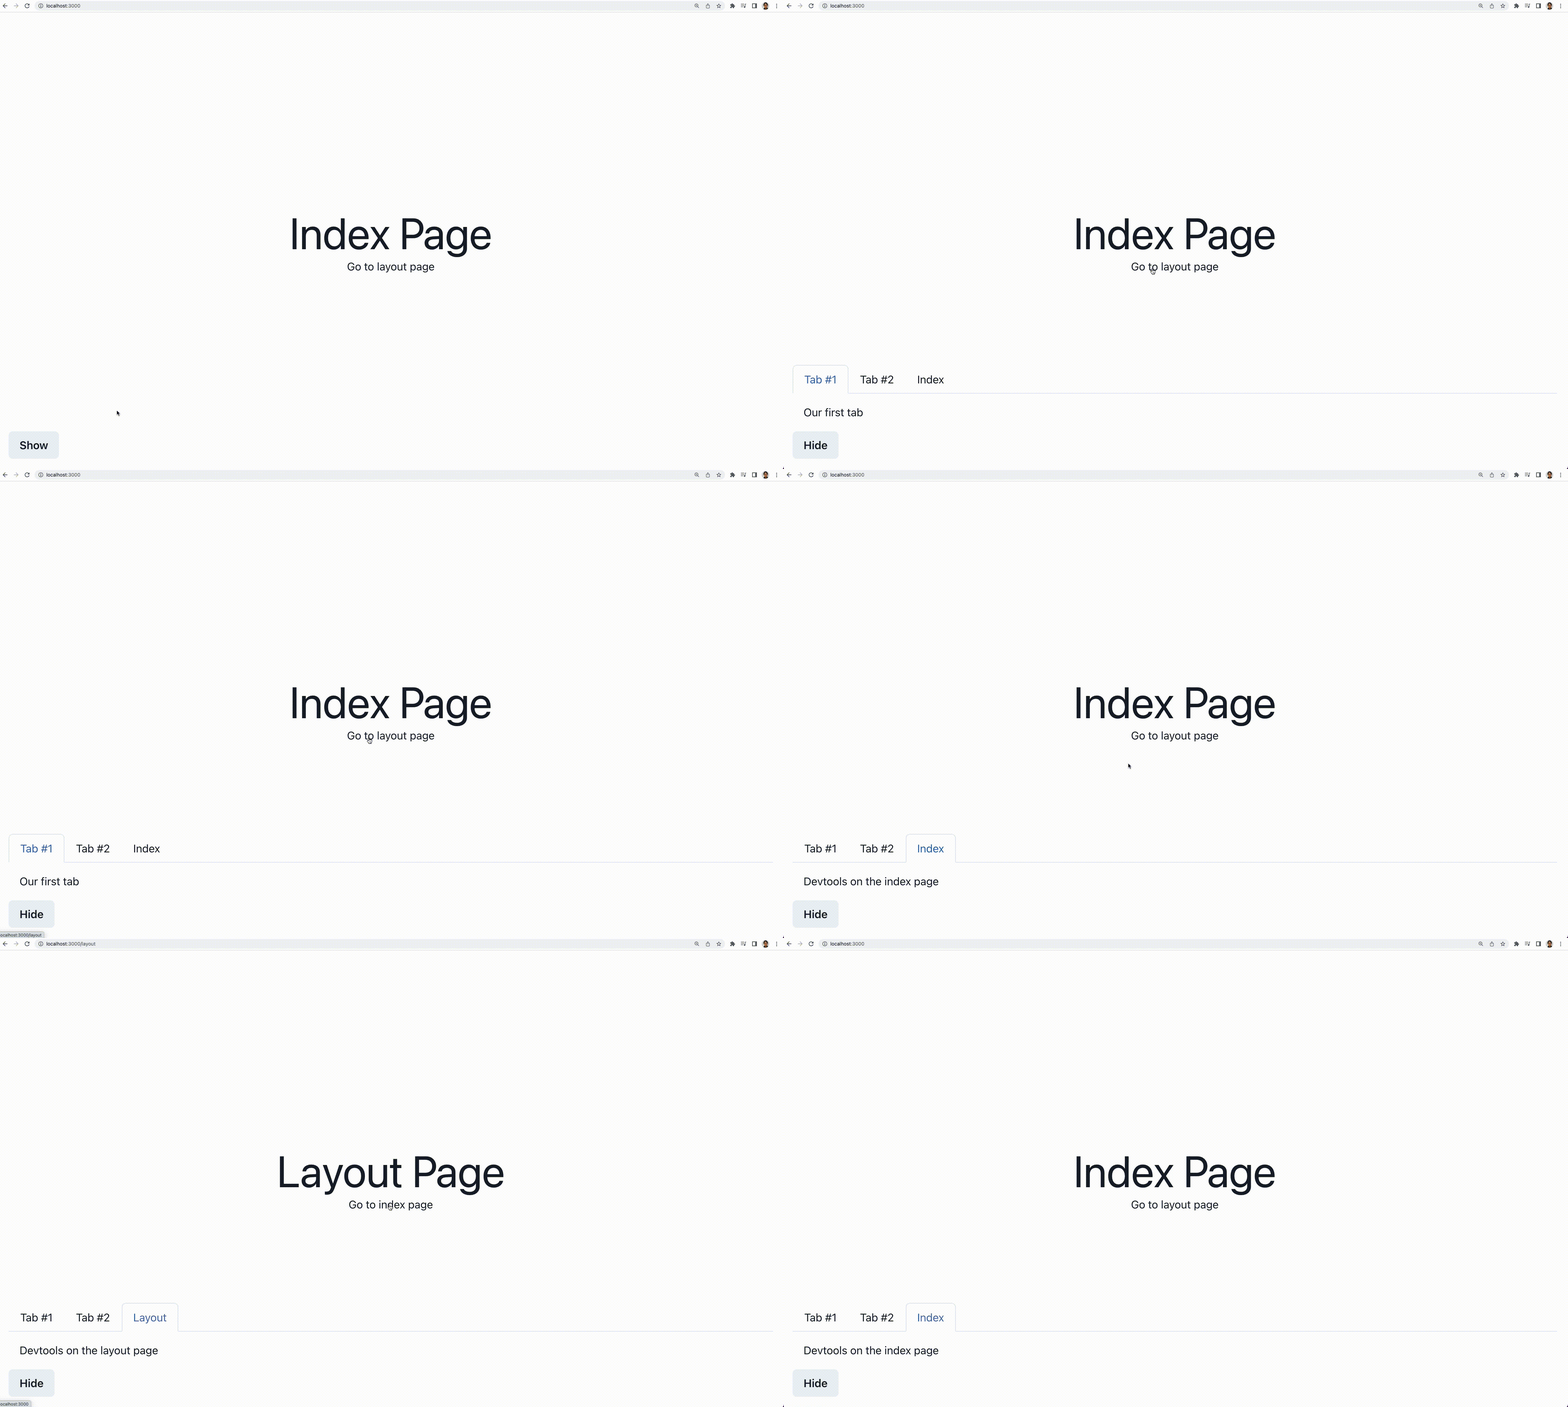
With these changes in place, you should be able to see a floating "Show" button that you can click on to open the devtools and play with them.

The tabs on our devtools are hardcoded and useless so far, there's no fun in that! Let's make them dynamic and contextual!
Make the tabs dynamic
We need our devtools UI to update every time there's a new tab or a tab is removed. Instead of pulling in a third-party library for this feature, let's extend the built-in Map.
Create a new file at components/Devtools/tabs.js and paste the following content:
import { useEffect, useState } from 'react';

// Extend the built-in Map to add some custom behaviour
class CustomMap extends Map {
  // Add a placeholder property to hold a callback function.
  // We'll override it later in our custom hook
  callbackFn = (updatedMap) => { /* TODO */};

  // Override the delete method to call the callbackFn
  // with the updated Map after deleting a key
  delete(key) {
    const result = super.delete(key);
    // Pass `this` to callbackFn
    // to give access to the updated values
    this.callbackFn(this);
    return result;
  }

  // Override the set method to call the callbackFn
  // with the updated Map after setting a new key
  set(key, value) {
    super.set(key, value);
    // Pass `this` to callbackFn
    // to give access to the updated values
    this.callbackFn(this);
    return this;
  }
}

// Initialize a CustomMap in a module level
const tabsMap = new CustomMap();
// Create a helper function to convert the CustomMap into an array
// https://developer.mozilla.org/en-US/docs/Web/JavaScript/Reference/Global_Objects/Map/entries
const getTabs = () => Array.from(tabsMap.entries());

// Export a custom hook to expose the tabs array
export const useDynamicTabs = () => {
  const [tabs, setTabs] = useState(getTabs);

  useEffect(() => {
    // And subscribe so that any change to the map causes a re-render
    tabsMap.callbackFn = () => setTabs(getTabs);
  }, []);

  return tabs;
};

// Export a function to register a new tab
// which returns an "unsubscribe" function for that tab
export const registerTab = (key, value) => {
  tabsMap.set(key, value);

  return () => {
    tabsMap.delete(key);
  };
};
Take some time and read through the comments to understand what the code is doing. In summary, the code holds all tabs in a Map and causes a re-render through useDynamicTabs every time the Map changes.
If you're confused about getTabs being passed by reference: both useState and setState/setTabs accept a function as parameter, so getTabs is called implicitly in both cases.
Now let's change the components/Devtools/Devtools.js file to read the dynamic tabs and react to the changes:
import {
  Box,
  Button,
  Tab,
  TabList,
  TabPanel,
  TabPanels,
  Tabs,
} from '@chakra-ui/react';
import { useState } from 'react';
import { useDynamicTabs } from './tabs';

const Devtools = () => {
  const [isOpen, setIsOpen] = useState(false);
  const dynamicTabs = useDynamicTabs();

  if (!isOpen) {
    return (
      <Box bottom="0" left="0" padding="1rem" position="fixed" zIndex="100000">
        <Button onClick={() => setIsOpen(true)}>Show</Button>
      </Box>
    );
  }

  return (
    <Box
      backgroundColor="white"
      bottom="0"
      left="0"
      padding="1rem"
      position="fixed"
      right="0"
      zIndex="100000"
    >
      <Tabs isLazy variant="enclosed">
        <TabList>
          {dynamicTabs.map(([name]) => (
            <Tab key={name}>{name}</Tab>
          ))}
        </TabList>

        <TabPanels maxHeight="300px" overflowX="auto">
          {dynamicTabs.map(([name, content]) => (
            <TabPanel key={name}>{content}</TabPanel>
          ))}
        </TabPanels>
      </Tabs>

      <Button onClick={() => setIsOpen(false)}>Hide</Button>
    </Box>
  );
};

export default Devtools;
Now our devtools will only display the tabs that are registered and their respective panels. Currently, there are none since the dynamic tabs start as an empty map.
To test its dynamism, call registerTab in pages/_app.js passing a string as the first and second parameters - since strings are valid React nodes.
// other imports
import { registerTab } from '../components/Devtools/tabs';

registerTab('Tab #1', 'Our first tab');
registerTab('Tab #2', 'Our second tab');

const Devtools = dynamic(() => import('../components/Devtools/Devtools'), {
  ssr: false,
});
// rest of the code
With the code above, for example, you should get two tabs in the devtools:

Contextual tabs
As shown in the previous example, you can register "global" tabs, that will be visible on every page. However, specific tools can exist in specific contexts. Let's register a tab for each page and make them available only while the page is active.
Open the pages/index.js file and modify it to register a tab after the first render:
// other imports
import { useEffect } from 'react';
import { registerTab } from '../components/Devtools/tabs';

const HomePage = () => {
  useEffect(() => registerTab('Index', 'Devtools on the index page'), []);

  // rest of the code
};

export default HomePage;
Open the pages/layout.js file and modify it too:
// other imports
import { useEffect } from 'react';
import { registerTab } from '../components/Devtools/tabs';

const LayoutPage = () => {
  useEffect(() => registerTab('Layout', 'Devtools on the layout page'), []);

  // rest of the code
};

export default LayoutPage;
Now open the devtools and notice that the "Index" tab is only available while on the / page. When switching to the /layout page, "Index" is removed and the "Layout" tab is registered.

That's important because we won't have irrelevant UI on the page we're currently working on. It works like that because registerTab returns an "unsubscribe" function and useEffect runs that function when the page/component is unmounted.
Relevant notes
Although I've used React here, the concepts can be applied to Vue, Svelte and others.
Tabs can be registered by specific components too, not only pages. For example, your notification center, when available and visible, can register a tab that allows notifications to be created. The same goes for your theme picker or whatever other component exists on your web application.
These devtools can make HTTP requests, modify cookies and anything possible in a web application since they're just part of your main application. The sky is the limit!
You can also display devtools from third-party libraries within your own, for example, react-query ships a very useful devtools component that you can display globally.
Closing thoughts
As mentioned in the beginning, this blog post is introductory and I didn't cover everything. Here is a list of changes you should consider if you want to take this idea to the next level:
- Render the devtools based on a specific cookie value
- Allow the user to resize the devtools with an auto-hide feature
- Persist if the devtools are open or closed, and maybe other states, to restore them after a page refresh
- Render the devtools only when
process.env.NODE_ENV === 'development'or using another environment variable - Enable tree-shaking the custom
Maplogic based on the same environment variable used to render the devtools
If you think something else is relevant too, please leave a comment!
A more complete example
I know the examples in this blog post are very basic and our devtools only have strings. The goal of the blog post is to open your mind to the idea of building custom devtools and I hope it was achieved!
To help you picture the power behind this idea, I've created a more complete example. It uses TypeScript and integrates a few third-party packages. A live demo is available at this link and the source code is available on Gumroad as a way of supporting my work. Let me know what you think about it in the comments or via email.
Further reading
- Learn more about the Chrome Devtools in Umar's excellent blog
- A collection of useful cross-browser DevTools tips
- canidev.tools - A caniuse-like website for the browser devtools
- Make your own DevTools by Kent C. Dodds
